
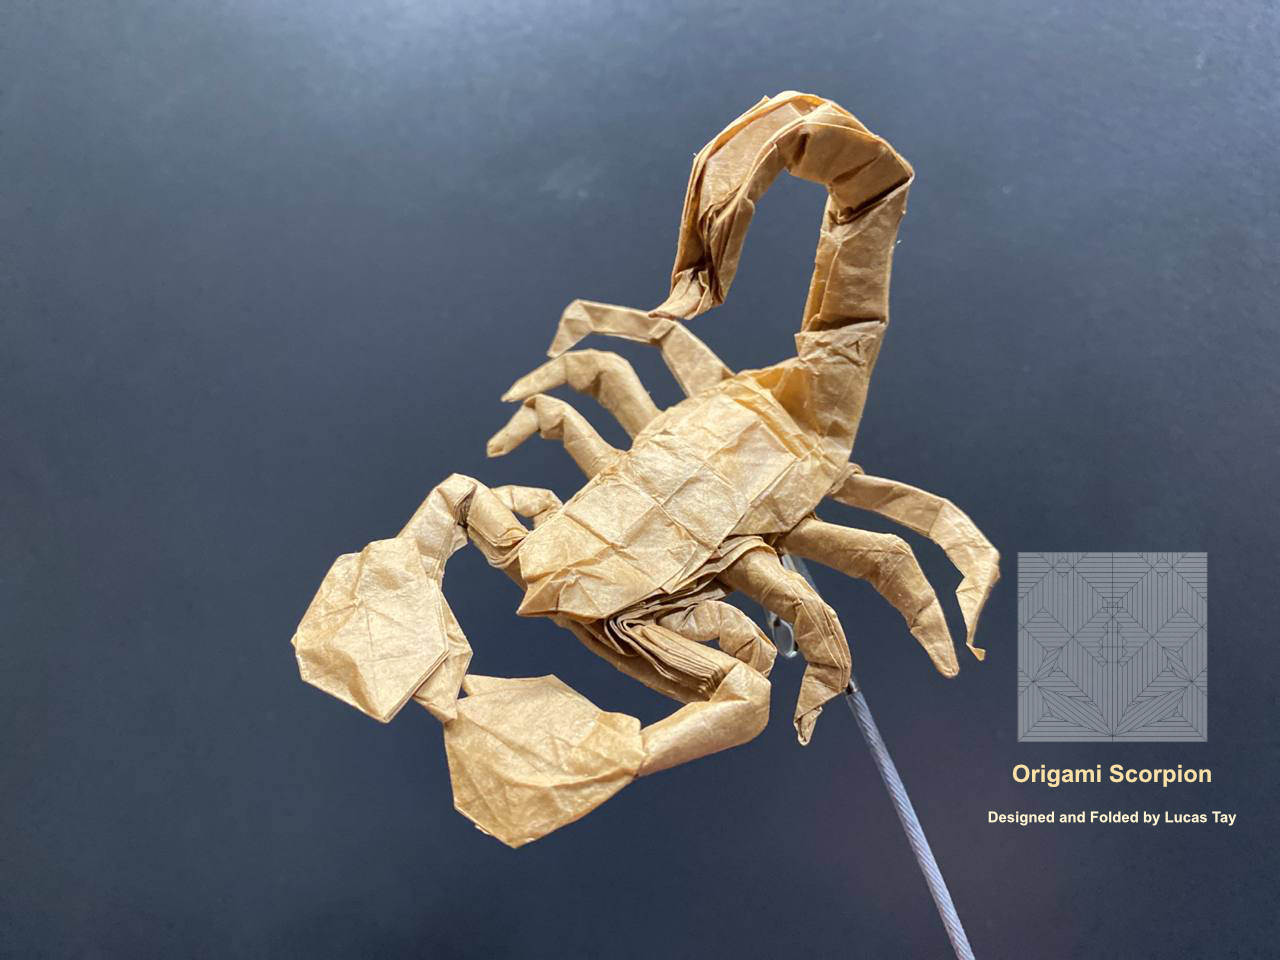
Scorpion (Design Overview)
Pre-requisites
This post benefits people who have folded quite a little of box pleating models and have basic understanding of the box pleating method for Origami Design.
Background
When I was little, when online resources aren’t that great, I have always wanted to learn how one design Origami models. I remembered looking at a book titled “Practical Origami” by Rick Beech and there was a gallery with super complex origami models. Ever since, I was in search of Origami books that teaches me more complex models. At the age of about 10, I found out of the Origami Design Secret book by Dr. Lang.
That was when I was introduced basic Origami design methods which led me to the Box Pleating Method. At that time, overlapping boxes were not documented in the book while there are designers out there doing that. How they did that was by using stretches and in some cases, Pythagorean stretches. That was when I wanted to learn more about that technique.
When the second edition of Origami Design Secrets was released, pythagorean stretches were introduced in it. However, it was still based off a not-so-generalized formula to calculate which can lead to really arbitrary coordinates. That said, MuTsun Tsai has recently developed the generalized (Offset) Pythagorean Stretch technique which gives a very easy way of constructing some stretches. This generalised method can guarantee that at least three or more of the four points of the stretches would lie in a grid (prefect for box pleating). More of these will be covered in another blog post.
Introduction
I would like to share how I have designed this origami Scorpion from scratch. This model makes use of the simple Generalized Offset Pythagorean Stretch (GOPS) gadgets to help construct its crease pattern.
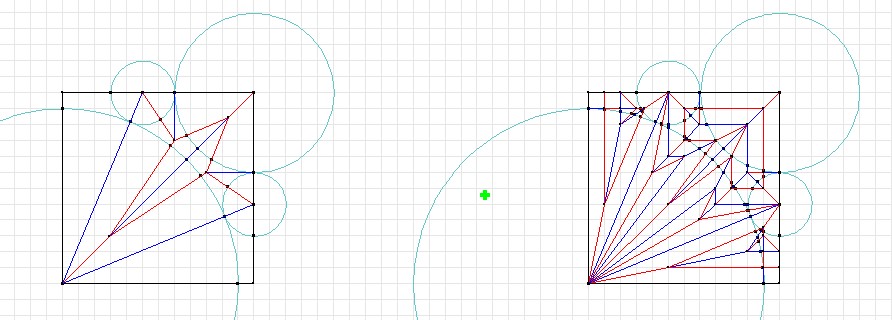 left: Standard Gusset Molecule in Circle packing, right: GOPS Gadget for box pleating allowing boxes to overlap
The not so good news is that at this point of writing, the above configurations have not been implemented yet; BPStudio has not implemented configurations for more than two overlapping rectangles and some half integral configurations for two overlapping rectangle. But fret not, though I may be busy, I will attempt to cover these construction techniques in this blog as time goes by.
The good news about this is that the most of the simpler GOPS constructions can be automated in Box Pleating Studio (By MuTsun Tsai) AKA BPStudio. You can download and install via this link ! This is the program which I created this model from!
You can also watch this video on basic concepts of Origami design if you are new to this!
Representing our model as a stick figure (Acyclical Tree)
Generally for thin models, unless we plan for it, we can usually make use of pure box pleating method (without things like level shifters which helps create “thick” bodies). Since I am making a simple scorpion model and I was on a public train on my phone, I decided to create a simple one without those.
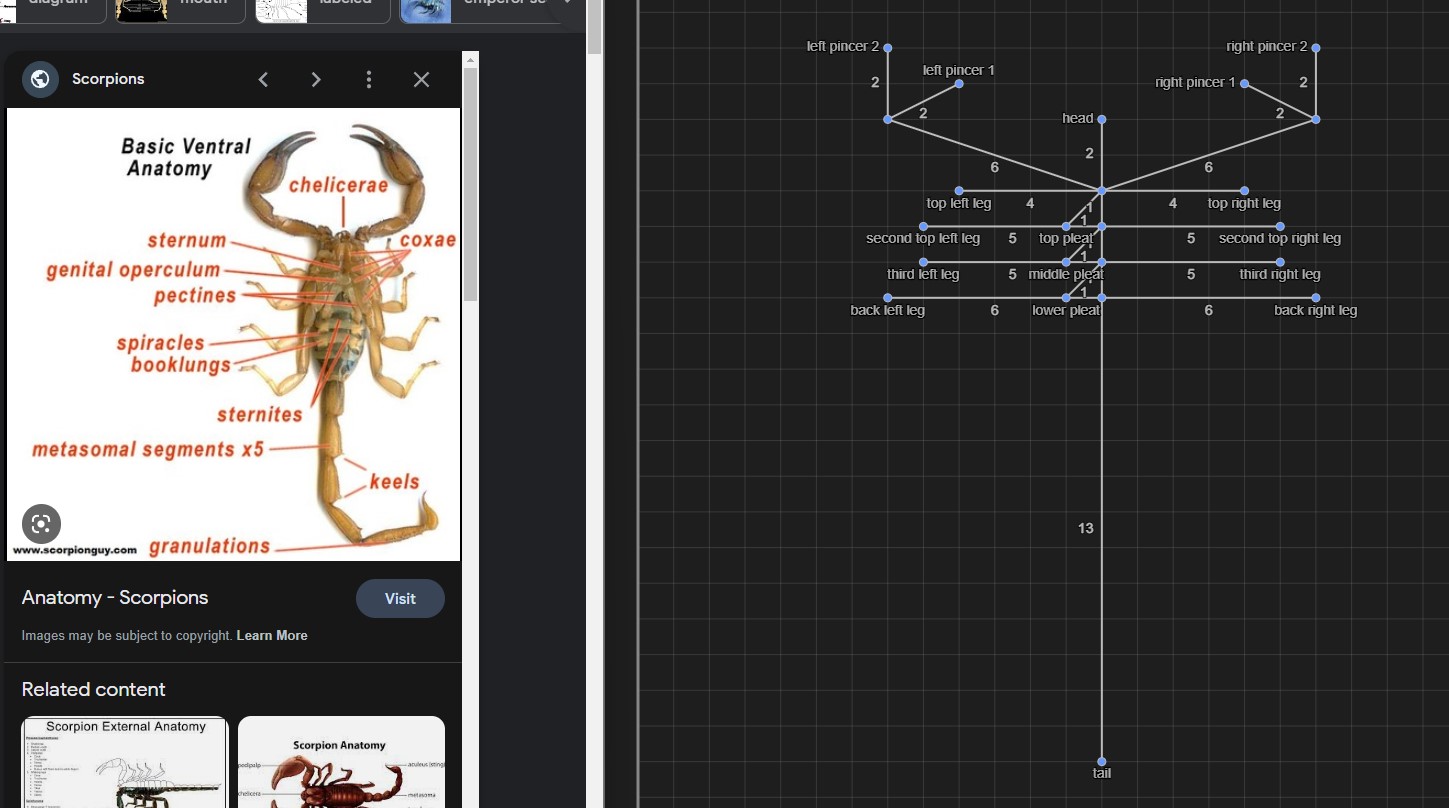
First thing I did was to come out with the stick figure of the scorpion including their rough proportions on BPStudio. I did so after looking at some reference images. ***
Things about the scorpion to note:
- The legs of the scorpion are not always of equal length. The hind legs are longer than the legs in the front.
- The arms of the scorpion are close to the face at the front.
- There are “plates” which overlap each other on the scorpion’s body
- The tail are pretty long
The following shows the resultant labeled stick figure that I have drawn.
Packing things up
Once the stick figure is drawn out, it is time to pack the boxes.
When packing the boxes, we should remember that :
- each line from one branch to leaf node represents one flap or appendage.
- every line that emanates from the same branch node to a leaf node should have circle or boxes “grouped” together. This means that they can be touching each other or the river if there are any.
- every line that are formed from branch to branch node represents the river. This means that different group of leaf nodes should be separated by the branch to branch length.
- Circles can never overlap each other but boxes may since circle is the minimal amount of paper that can be assigned to a flap. Logic being that a point in the leg will never be able to a point on the body.
- Any red circles in BPStudio signals that there are illegal overlappings.
- All parts of the paper should be accounted for and not be left blank. This just means that paper was not fully used and its either left as unwanted ( still need to be hidden ), or removed via scissors ( frowned upon ).
- The more area of the circle in the paper, the thicker that flap would be. Since the tail is really long, we will want to use as little of an area for the tail as possible.
- To make this model easier, I have made it into a book symmetry so the model would be symmetrical
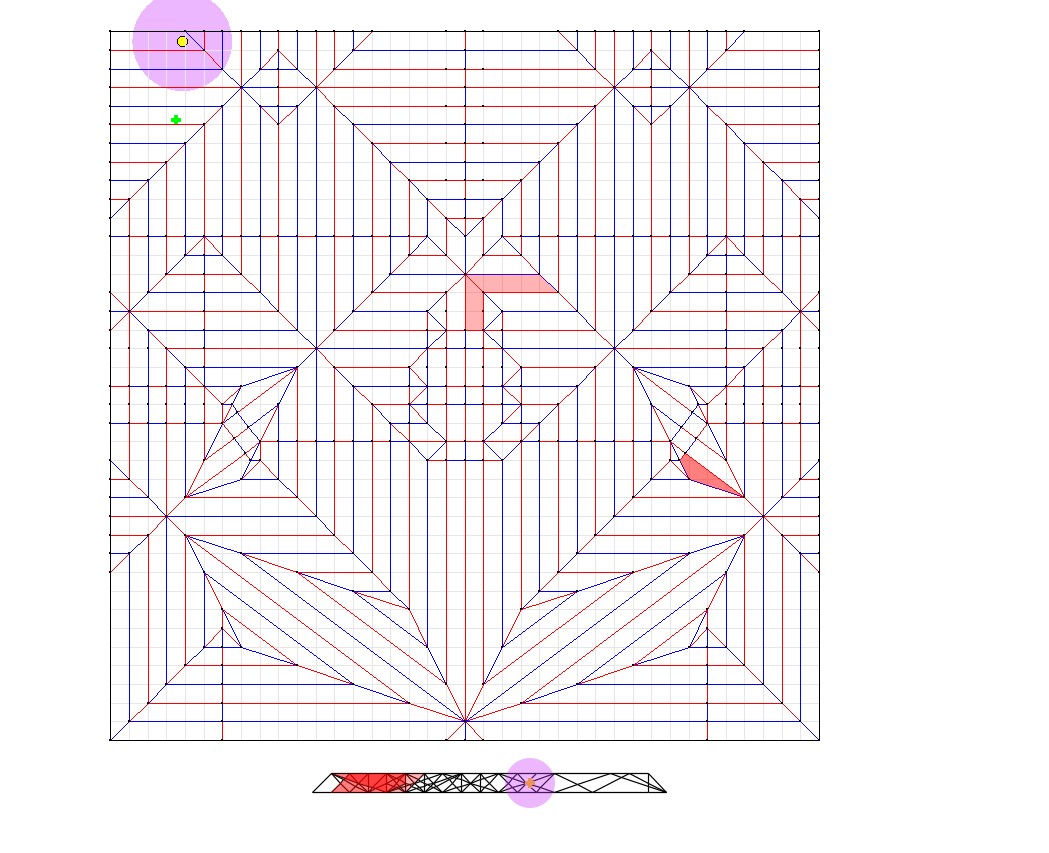
Following the guidelines above, I have came up with the following packing :
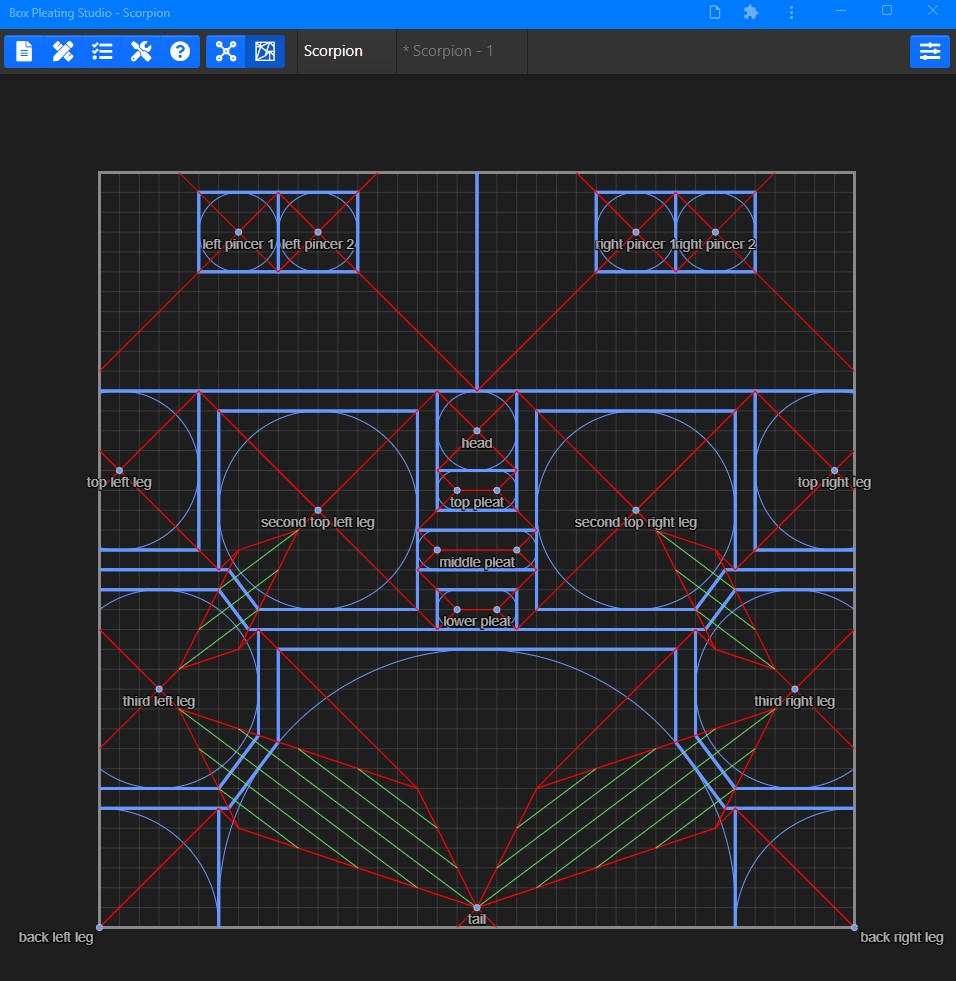
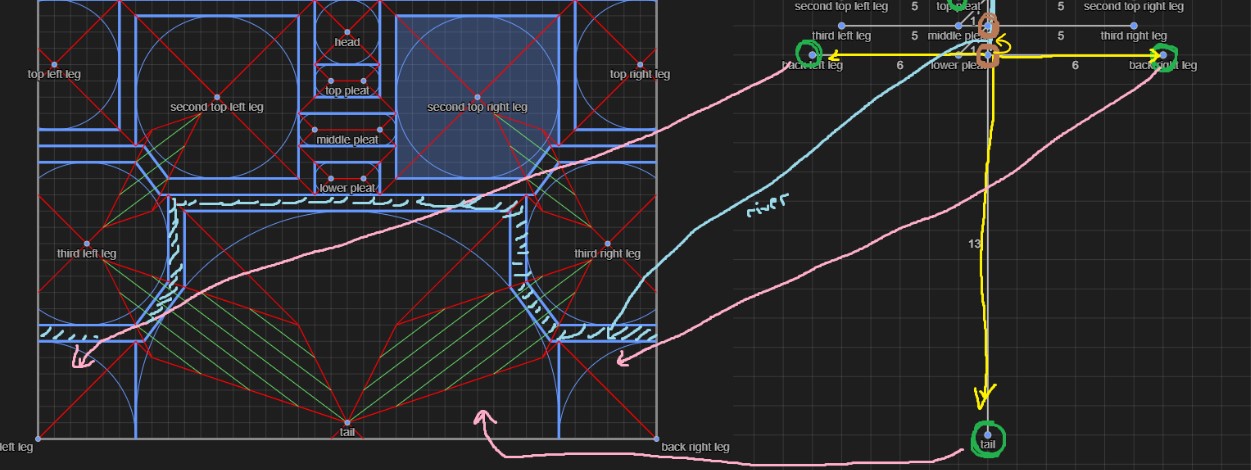
Let me give you a deeper look into the conversion between the stick figure and the packing.
The green circles represent the leaf nodes. The brown lines represent branch nodes. We can draw a yellow line from the branch node to leaf nodes. All leaf nodes that are pointed to by the branch nodes needs to be grouped together. The blue lines are rivers which correspond to lines from branch to branch node.
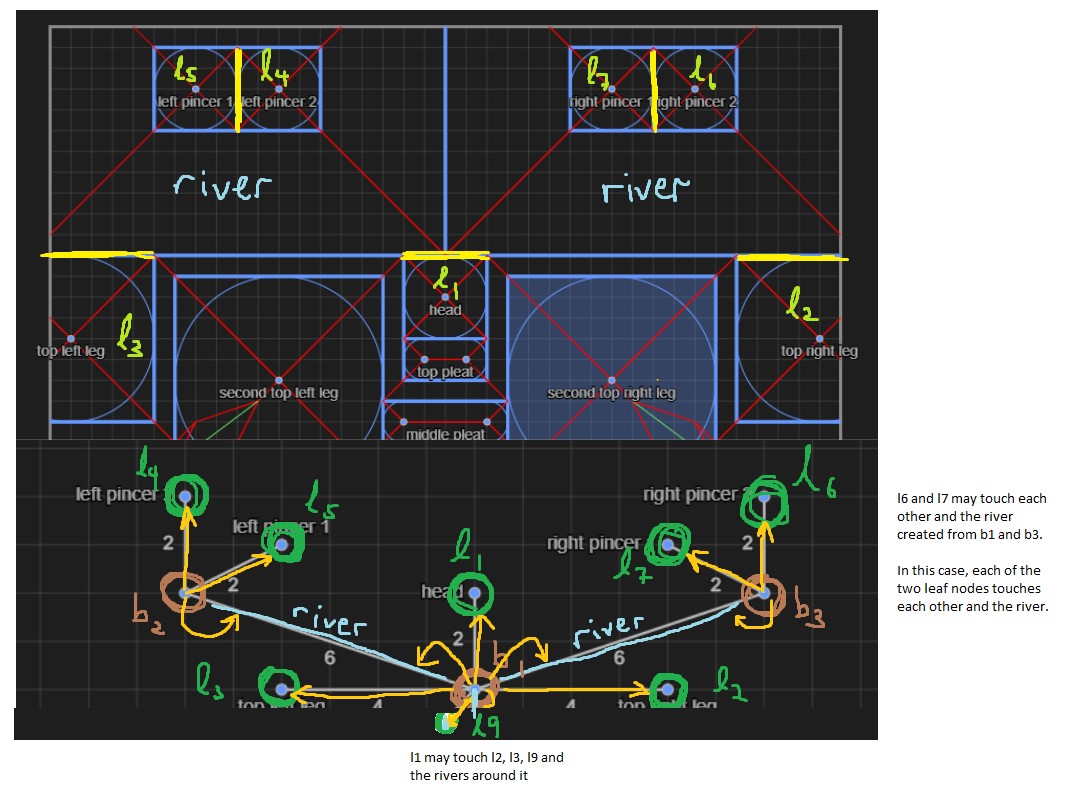
For instance, b2 points to l4 and l5. This means that l4 and l5 should be group together before being surrounded by the river. This means that l4 can touch l5 and the river. Another example would be b1. The leaf nodes from b1 are l1, l2, l3 and l9. This means that l1, l2, l3 and l9 should be grouped together and can be touching each other as well as the two rivers from the previous example and the other one unit long river.
Here is just another example to help you see the intuition behind this.
Again, the bottom-most branch has three leaf nodes and a river node coming out from it. This means that we can group the three leaf nodes and separated by the river. The three leaf nodes may touch each other and only one side of the river.
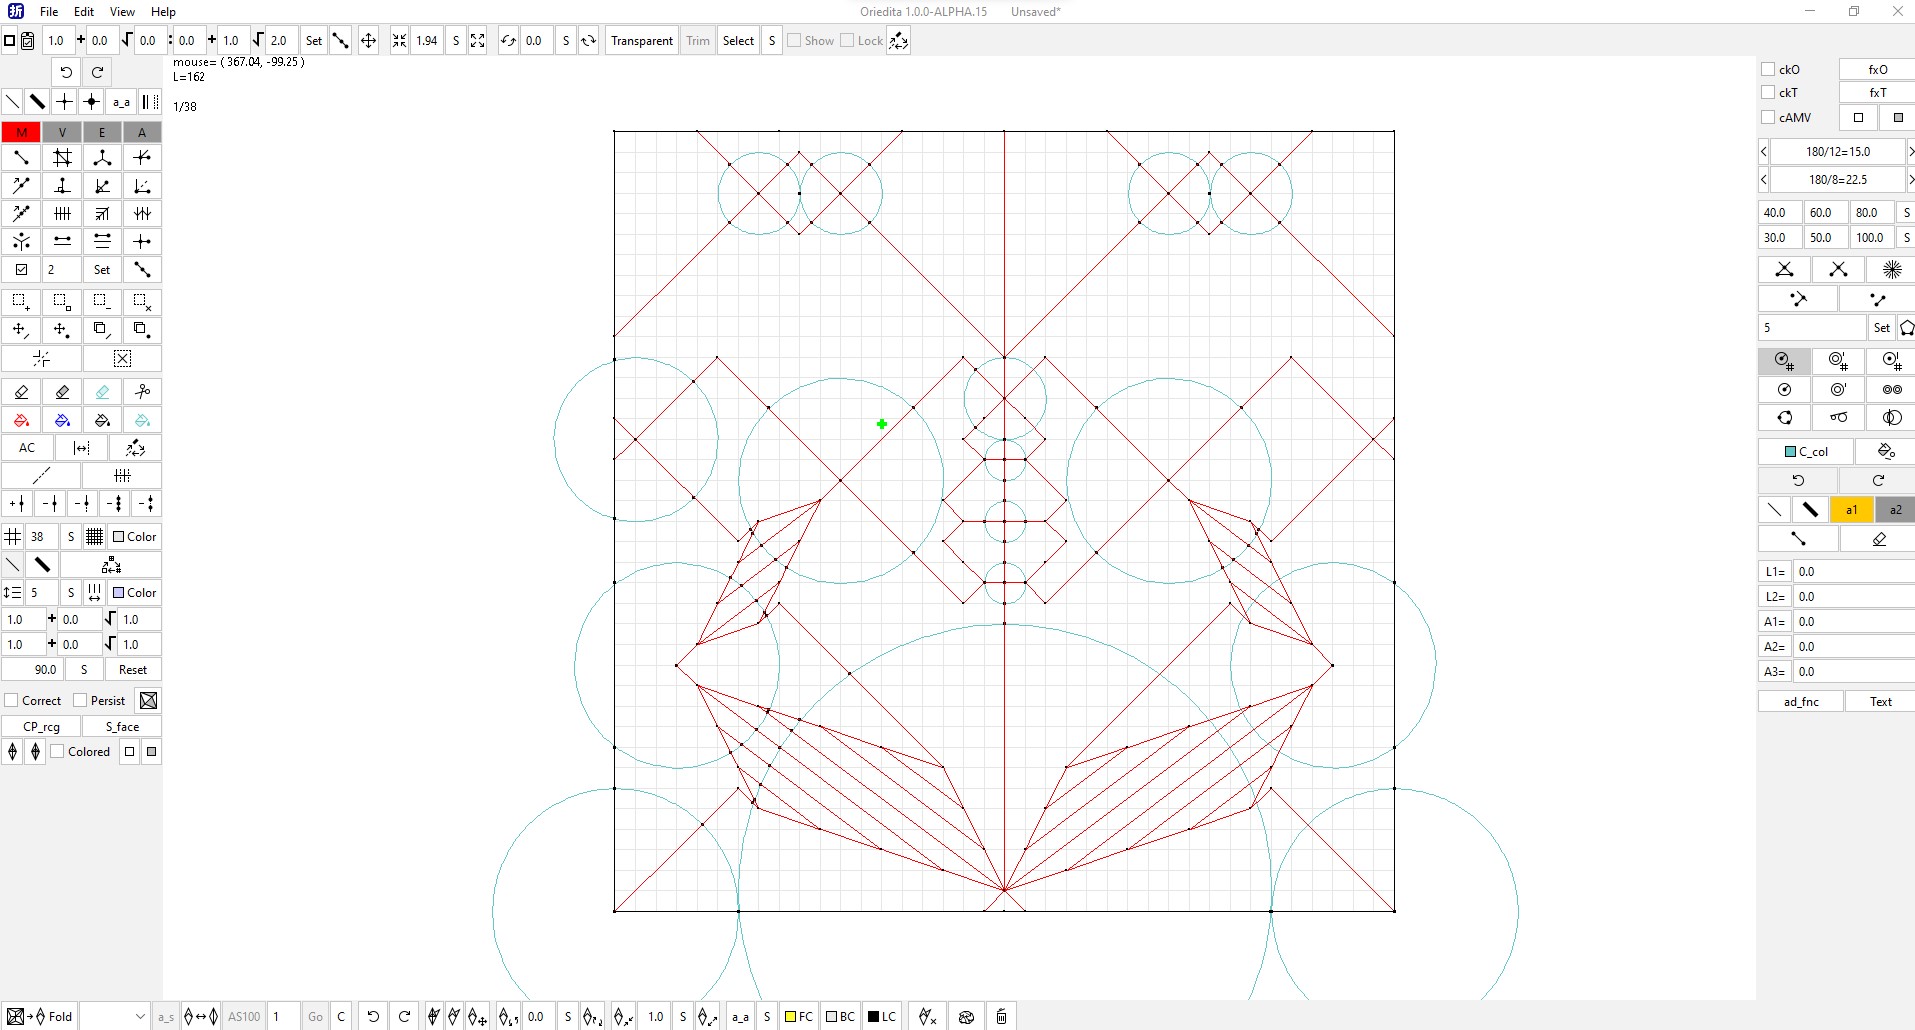
Assigning Creases in Oriedita
I have used this software ( a forked version of orihime ) which allows us to draw crease patterns and check for flat foldability. It also includes layer checking to make sure that there are no self intersection as well. You can download this software from this link.
I will first draw all the lines that we see in the Box Pleating Studio without the blue lines ( showing the boundaries of the flaps ).
Next, based on box pleating theory, I assigned the creases. You can learn more about box pleating from Origami Design Secrets Book by Robert J. Lang.
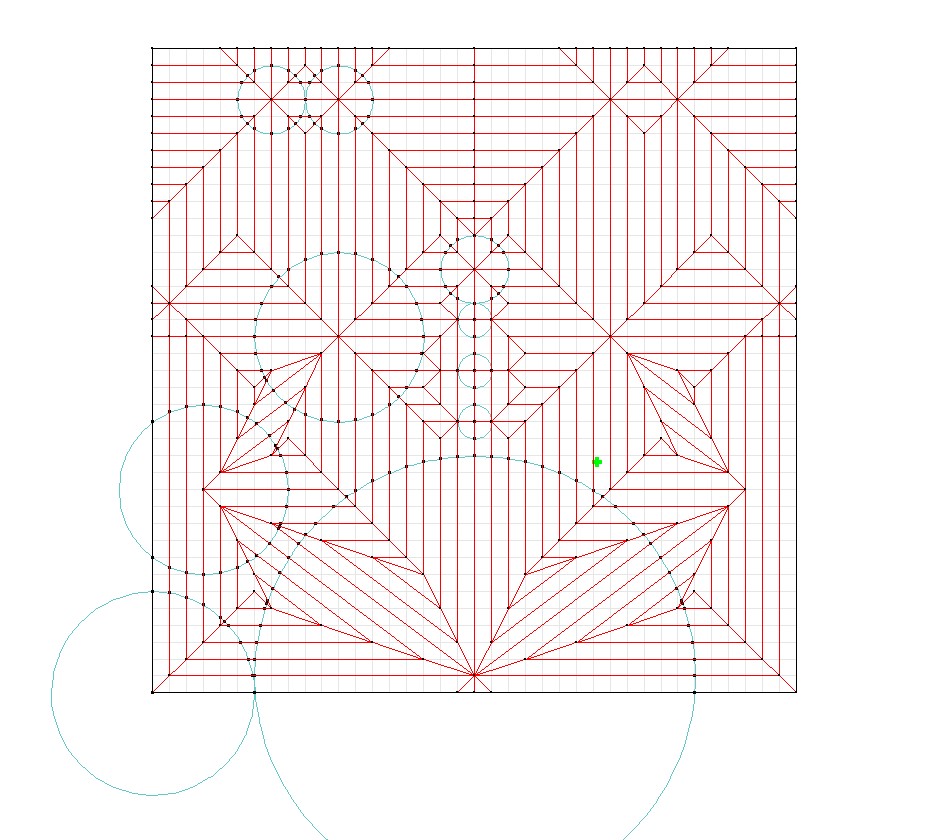
This is still relatively incomplete. This model as it is is not flat foldable!
We need to follow more rules to ensure that this can be folded flat.
- The alternating angles around a single vertex should add up to 180 degrees.
- The difference between the number of mountain folds and valley folds shoud be plus minus 2.
- There should be even number of folds around a single vertex.
- Two Colorability. Every face in the Crease Pattern when colored with two colors should not have any adjacent face containing the same color.
We can check with the cAMV checkbox to see if we have a flat-foldable model!
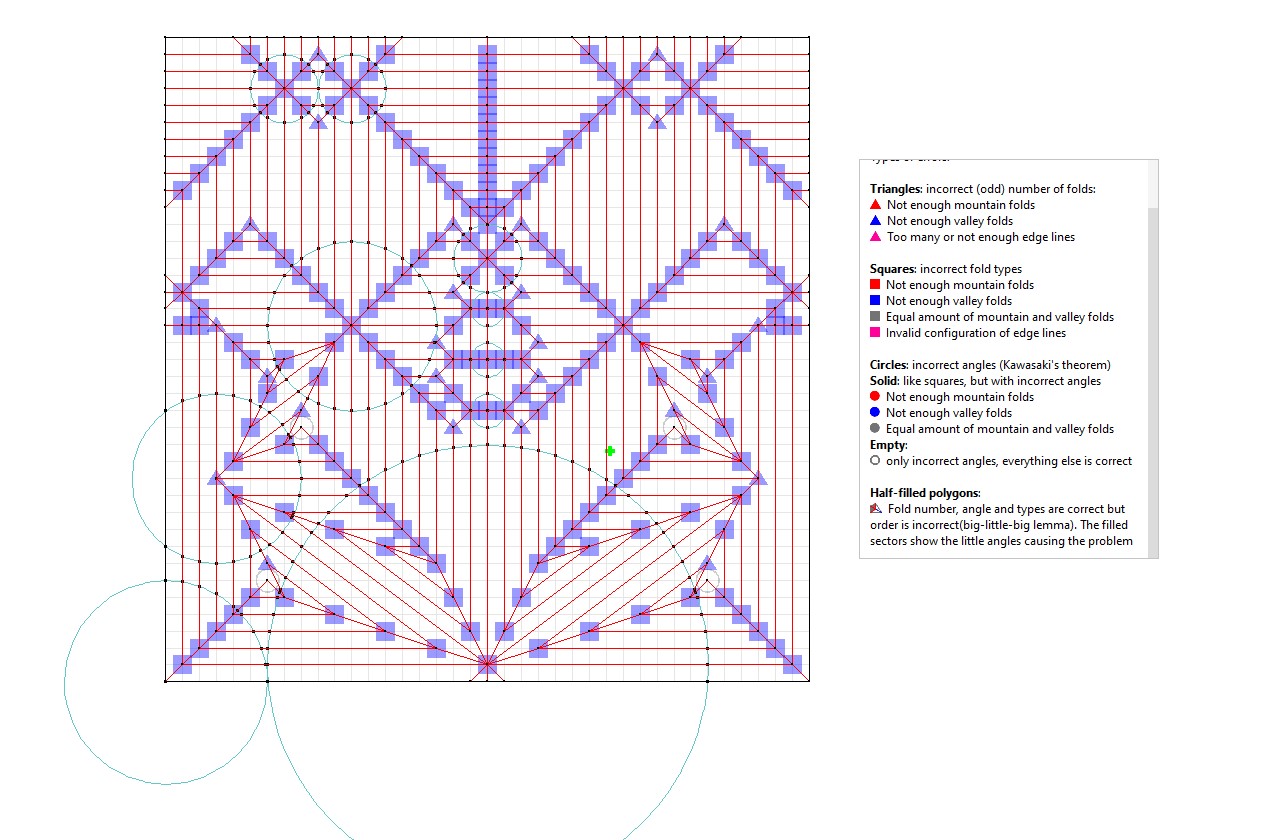
Now it is a matter of correcting any errors in the crease pattern and add in any lines that was missed including hinge creases wherever necessary.
After trying the first attempt, I failed to fold due to self intersection.
Well, here is the embarassing part. I was not able to find the specific crease assignment but what I have drawn so far was really close to the original and so I went ahead to fold it to find the proper layer arrangements.
Folding
From here, you can see the steps:
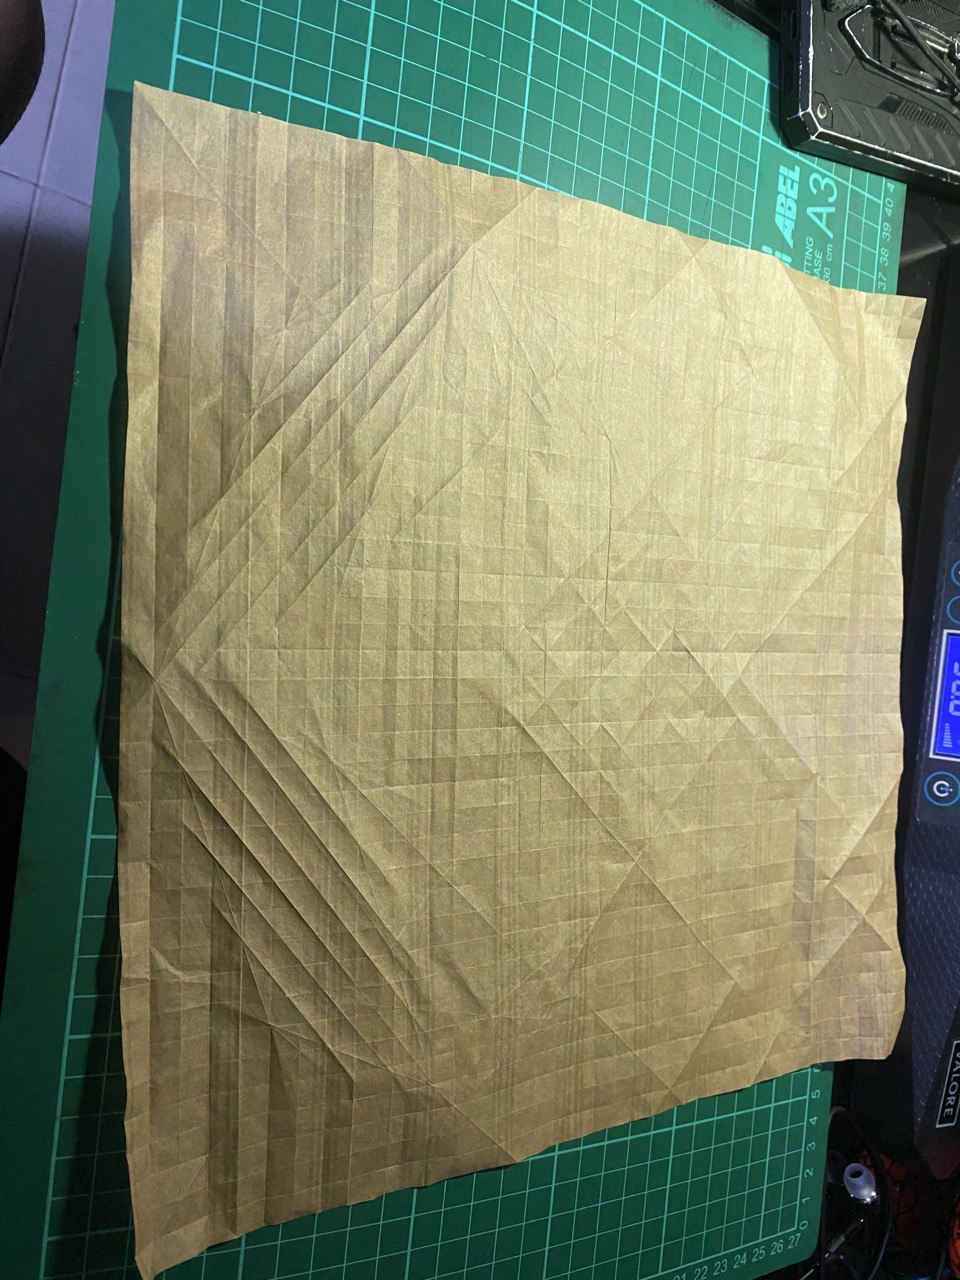
- Pre creasing
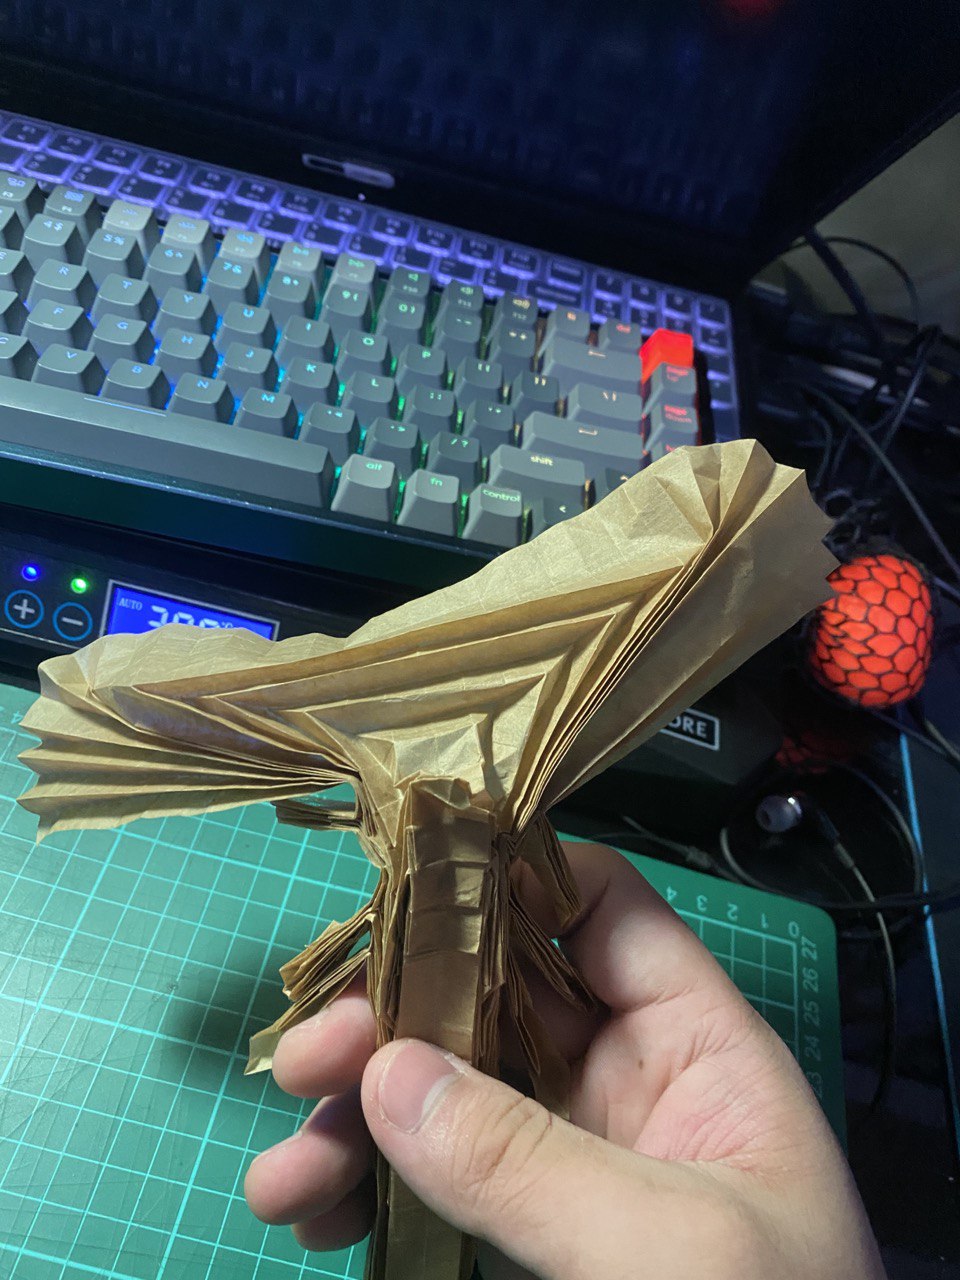
- Collapsing of base with the right layering
- Completed collapsing of the base from the Crease Pattern
- Shaping
- The final product after applying Methycellulose with more hours of shaping !
- The purpose of Methycellulose is to make the model studier and more durable in humid weather.
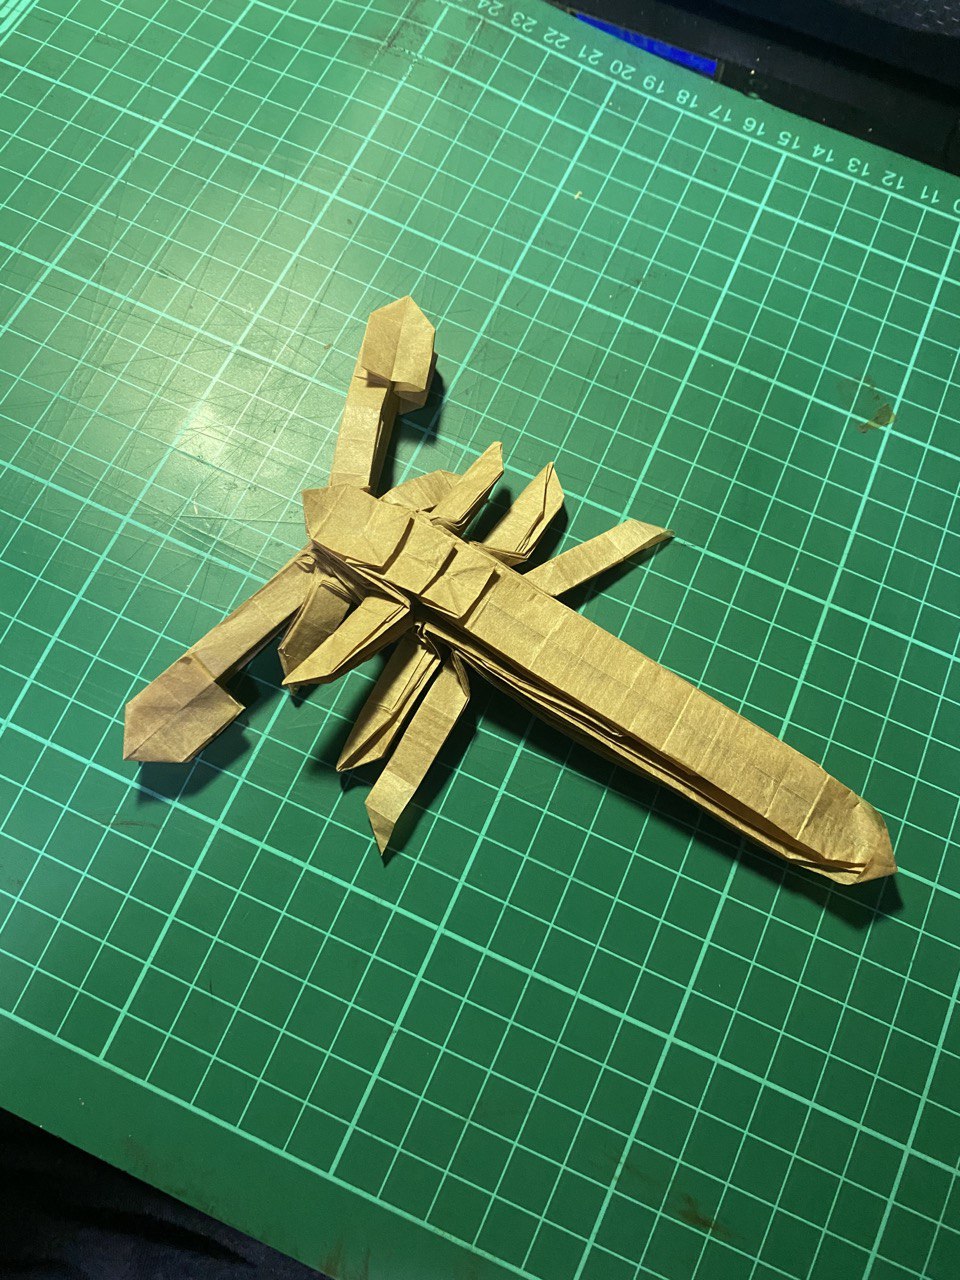

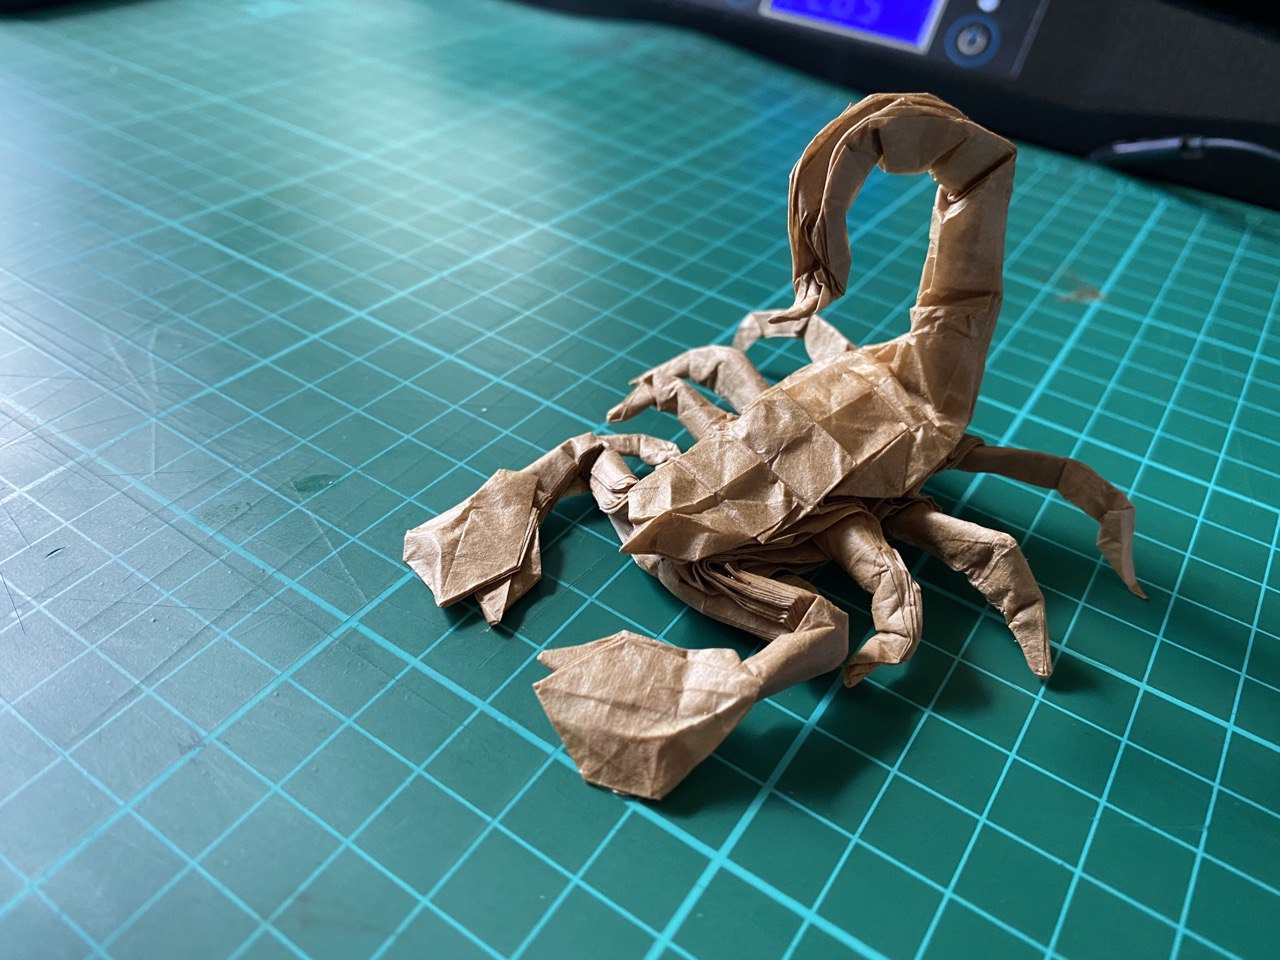
You can try to see if the folded base does resembles the stick figure in terms of the number of units of each length.
Conclusion
Box Pleating Studio by MuTsun has been a great help in terms of quick prototyping of Origami Design. It is also ideal when most of the model’s body parts are narrow like insects or in this case scorpions. Of course, more work can be placed in the design for scorpions with larger body where level shifters comes into play. Other techniques like ERM can come in useful as well however this is out of the scope and I have not mastered that just yet. Certainly, we can also construct these however, we can be thankful that this model has a simpler construction that has been done by BPStudio. Also, it is definitely possible to construct any kind of stretches (Even those that are currently not implemented by BP Studio yet!). More about that next time!
For those who would like play around with this project, you can play with it here on any browser!